Our Greek Yogurt Starter makes genuine Greek yogurt
(???????? ????????) of exceptional quality with classic Greek yogurt
taste, creaminess, mild acidity and aroma.
The yogurt is mild, thick and creamy in nature and has an
unforgettable taste that can only be compared with that Greek yogurt you
tasted during your trip to Greece. It is unlike any other Greek-style
yogurt you?ve ever tried.
This is an authentic Greek heirloom yogurt starter. Each pack
contains loose powder mix, in perfect proportions, of the two strains
required to make the perfect Greek yogurt ? lactobacillus bulgaricus and
streptococcus thermophilus.
The
Greek yogurt starter makes Greek yogurt which tastes as amazing as
Bulgarian yogurt, just a bit milder, not as tart, somewhat creamier, and
somewhat thicker than it. Greek yogurt is very similar to Bulgarian,
just less tart and thicker and this is exactly the yogurt this starter
will make for you.
Each pack contains loose powder mix, in perfect proportions, of the
two strains required to make the Greek yogurt ? lactobacillus bulgaricus
and streptococcus thermophilus. It makes thick, creamy and absolutely
delicious yogurt.
The starter is organic and fully natural with no preservatives,
additives, artificial colors or flavors. It contains no GMO ingredients
and it is gluten free.
This is a heirloom yogurt starter with live active bacteria, which
means that you can reuse yogurt from your previous batch to culture your
new batch, for as long as you wish.
Product Details
Type: Heirloom Greek yogurt starter. This means that
you can make endless batches of Greek yogurt, simply reusing your
previously made yogurt to start a new batch.
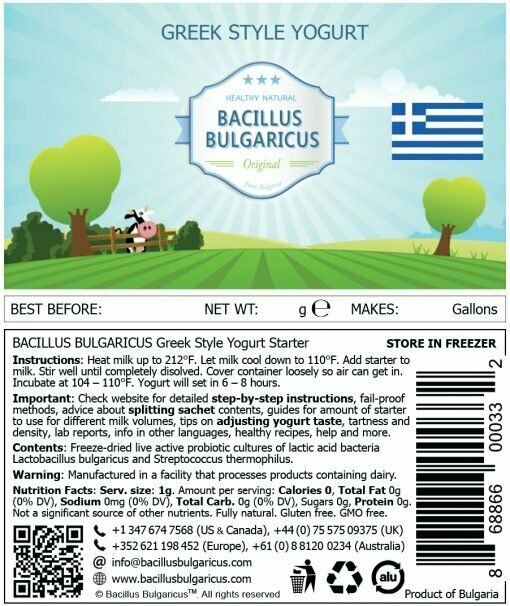
Activity and Strength: 1 gram of starter contains at least 25 billion colony-forming unit (2.5 x 10¹⁰ CFU/g) of lactic acid probiotic bacteria strains.
100% potency guaranteed. 100% viability guaranteed.
Ingredients: Live active lactic acid cultures (lactobacillus bulgaricus and streptococcus thermophilus).
The starter contains nothing more than the strains it is made of and a
very small quantity of dried organic skim milk powder. It is the medium
on which the strains grow and some of it gets packaged together with
them. The milk powder is completely consumed by the bacteria during
incubation so there is none of it in the finished product. See some more
information about our lactose free and vegan starters.
Contents: This is an heirloom starter with freeze-dried live active bacteria.
Each sachet contains loose powder mix, in perfect proportions, of the
strains required to make excellent Greek yogurt. The exact amount of
starter varies per pack and is indicated, in grams, under your selected
pack size on the product purchase page. More information about various
pack sizes and their contents can be found here.
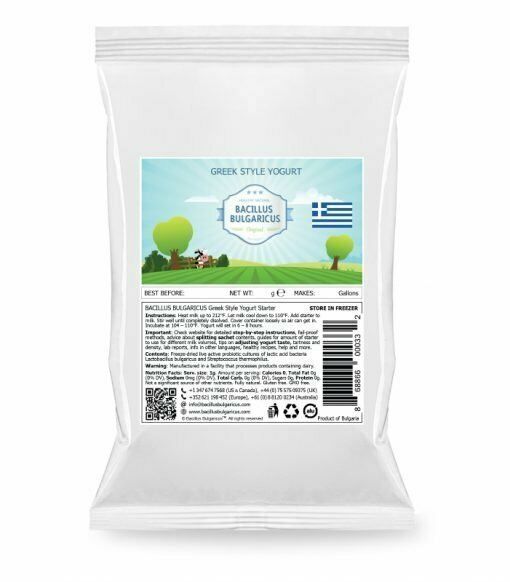
Packaging: Aluminum foil pouches, sealed. 100% recyclable. Plastic free.
Label: Paper. 100% recyclable. Plastic free.
Details: 100% natural, No additives, Gluten free, Soy free, GMO free, Halal, Kosher.
Milk to use with: This starter is OK to use with
dairy milk, non-dairy milk , vegan milk, basically any milk that you
would like to turn into yogurt. It is excellent for frozen yogurts too.
Do not use with lactose-free milk as lactose is the source of food for
the bacteria ? using lactose-free milk will starve it and you won?t get
yogurt. See some more information about our lactose free and vegan yogurt.
Nutritional Information: Available here
Lab test data: Available on request.
Industrial size option: DVS (direct-vat set) packs for manufacturers available on request. If you require starter for vats larger than 150L contact us to place an order.
Origin: Produced in Bulgaria.
Storage
Store the Greek Yogurt starter in the FREEZER.
Use by the date indicated on the label.
Bacillus Bulgaricus starters are shipped in sealed sachets.
Transporting the packs (i.e. shipping them
to you) at ambient temperatures (even in the warmest climates) is
perfectly OK and will not damage the live cultures. We use a
freeze-dried process that keeps the strains alive and comfortable even
during long trips in hot weather.
Once you receive your starter packs ? pop them in the refrigerator or the freezer for best storage.
2+ years at around 0F (-18C) or lower (in the freezer)
1-2 years at around 40F (4C) (in the fridge)
Up to 1 year at ambient (room) temperature.
Unfreezing the starter packs and freezing them again (e.g. when using only a portion) is OK to do, even multiple times.
Usage
The packs are packaged and labeled with the grams they contain and the volume those grams make when used entirely in one go.
The packs are intended for single use, or their contents could be split for multiple use.
When you split the pack, take out as much
as you need to make your yogurt, then reseal and refreeze the remaining
starter for later. Make sure you store the sachets in a way that
prevents moisture from getting in, i.e. well closed in a Ziploc bag or
wrapped around and fastened with a rubber band.
When
you split the contents of the pack and use less starter amount to make
smaller volumes, keep in mind that you are also reducing the total
amount of yogurt that you can make from the pack (read more on that here).
Refer to this page to see the gram to Liters (gallons) chart and to find out how much starter to use for different volumes of milk.
How To Make Greek Yogurt
It is super easy to make yogurt using this yogurt starter. You can
make your own yogurt with or without the help of an yogurt maker.
When you introduce the live culture into prepared milk the
streptococcus thermophilus bacteria goes into action first and prepares
the perfect environment for lactobacillus bulgaricus, which starts
multiplying and slowly turns the milk into genuine Greek yogurt.
These two beneficial, transient bacteria work together in the fermentation process that turns milk into the world?s best yogurt.
The process takes approximately 6-10 hours to complete.
We have described two methods for making Greek yogurt:
The traditional method ? if you prefer to make your Greek yogurt the
conventional way, manually or with the help of a yogurt-making machine.
A fail proof method ? if you have difficulties getting good results
with the traditional method or would like to get your results faster,
try this fail-proof manual method instead.
How to make Greek yogurt instructions.
It is super easy to make Greek yogurt using our Bacillus Bulgaricus yogurt starter culture.
Traditional Greek Yogurt Making Instructions
Use this method if you prefer to make your
Greek yogurt the traditional way, manually or with the help of a
yogurt-making machine.
This is the traditional method to make yogurt manually. If you are
using a yogurt-making machine, just follow the instructions that came
with the machine.
If you are having issues with the traditional method or would like to try the failproof manual method that I like to use, then find it here.
Bring the milk to a gentle boil. Milk boils at about 212F / 100C.
Be careful not to burn it, otherwise your yogurt will inherit the burnt
taste.
Note: You are
doing this in order to kill any existing bacteria in the milk, which
could react with the starter strains. You are also doing it because
heating the milk denatures its proteins and realigns its fat molecules
in a way that makes a more superior yogurt.
Let the milk cool down on its own to 110F / 43C. You can process
it in the same container or move it to separate containers for
incubation. One-quart/liter mason jars work best.
Note:
The easiest way to test for the right temperature is to dip your pinky
finger in the milk ? if you can comfortably hold it in for 5 seconds,
then the milk is just right.
Add the starter from the pack to the milk and gently stir until it dissolves.
Note: At no time whisk. Whisking introduces air bubbles into the milk and that slows down incubation.
Cover your containers loosely with their lids or a towel. Do not
close them air-tight. Towel is better to use because it allows air to
still go in, which speeds up activation a bit.
Cover and wrap the containers in blankets well to minimize heat
loss. Make sure there is blanket underneath them as well. Keep out of
draft.
Note: During incubation the temperature should ideally remain unchanged at 110F / 43C or very slowly decrease over time.
Yogurt will take about 6-8 hours to set.
Note: Yogurt has set
when it separates cleanly from the sides of the jar when you tilt the
jar. Keep in mind that the colder the environment, the longer your
yogurt will take to set.
Move the yogurt to the fridge and keep it there for at least 2 hrs
before eating it. Cooling the yogurt will help it thicken and improve
its taste.
Enjoy!
Do
not forget to save a cup of the ready-made yogurt to use for making
your next batch! Keep that in the fridge and make sure you use it to
make your new yogurt within 3-4 days to ensure all bacteria is viable
and in great condition.
Fail Proof Greek Yogurt Making Instructions
Use this method if you have difficulties getting good results with the traditional method.
This method will guarantee that you will always get the best results
when making yogurt. It is designed to outline the small pitfalls in the
yogurt making process and to make it easier for you to avoid them.
Bring the milk to a gentle boil. Milk boils at about 212F / 100C.
Be careful not to burn it, otherwise your yogurt will inherit the burnt
taste.
Note: You are
doing this in order to kill any existing bacteria in the milk, which
could react with the starter strains. You are also doing it because
heating the milk denatures its proteins and realigns its fat molecules
in a way that makes a more superior yogurt.
Set aside a cup (200ml) from the milk.
Note:
You are doing this because the milk in the cup will cool down faster
than the rest and you will be able to give the starter more time to thaw
and start the incubation process.
Keep the rest of the milk in the container you heated it (or
distribute it to the culturing containers ? 1L mason jars work the
best).
When the milk in the cup is at 86-90ºF / 30-32ºC (it will feel
lukewarm to the touch), add the starter from the pack to it then gently
stir it until it dissolves, about a minute.
Note: You are adding the starter to the milk in cup, not to the milk in the containers!
When the rest of the milk (in the containera) is ready, at 108-110ºF
/ 42-43ºC (you should be able to hold your pinky finger in it
comfortably for five seconds), distribute the milk from the cup (the one
with the starter) to the jars, proportionally to their volume.
Gently stir the milk in the jars.
Note: At no time whisk. Whisking introduces air bubbles into the milk and that slows down incubation.
Place a blanket in your microwave (or oven).
Note: Microwaves and ovens are thermo-insulated. By incubating inside them, you make sure you minimize heat loss.
Place the jars in the microwave on the blanket.
Loosely cover the jars with their lids or a towel.
Cover with and wrap around another blanket or a large towel. Make
sure the blankets are covering the jars from all directions to minimize
heat loss. This will make sure jars stay warm all throughout the
incubation process.
Leave overnight (about 8 hours). Check to make sure yogurt has set,
if it hasn?t, leave it longer and check every couple of hours, until it
sets.
Move to the fridge and keep there for at least 2 hrs before eating
it. Cooling the yogurt will help it thicken and improve its taste.
Enjoy!